Documentation
License
BandAid and its associated data/documentation is copyright (c) 2013 Chris B. Newton (N6EWT). BandAid is built upon the Java-Gnome user interface library and runtime portions of it are included in this distribution to facilitate binary installation. See the Java-Gnome website for copyright and licensing details.
This program is distributed in the hope that it will be useful, but WITHOUT ANY WARRANTY; without even the implied warranty of MERCHANTABILITY or FITNESS FOR A PARTICULAR PURPOSE; and under the terms of the GNU General Public License version 2 (GPLv2). For more details and to obtain a copy of the license, visit GNU Licenses.
Installation
For installation notes specific to your platform, see the README file that came with your distribution.
Running BandAid
BandAid is a java application, so it is invoked by launching your java VM and passing it the BandAid JAR file. Something like:
java -jar BandAid.jar
will usually work. To make this easier, your distribution includes a batch file or script to start BandAid. Please see the README file that came with your distribution for details.
Basic Tour
BandAid presents a thin horizontal window, divided into two panes - each pane presenting a different view of the currently-selected band. The top thin pane displays a summary of the entire band. Regardless of band size, this top pane displays the entire thing from a "bird's-eye view". The main pane below displays a portion of the total band, automatically scaled to comfortably display detail and support browsing. A translucent window overlay's the top summary pane to indicate the portion of the band currently displayed in the main bottom pane. This is called the "current view".
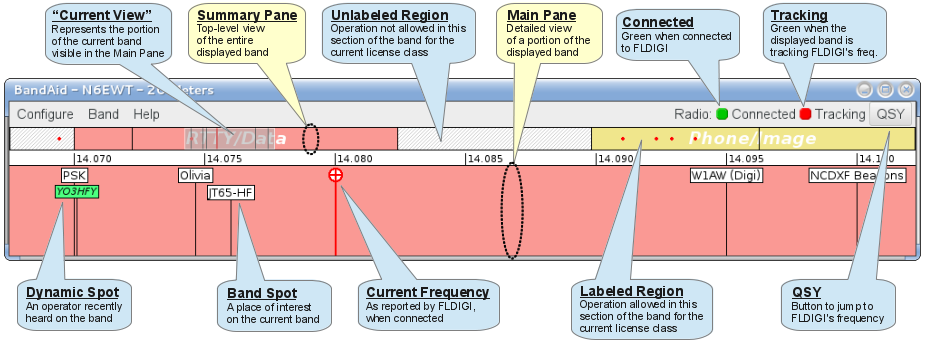
Various points of interest will be indicated on both the summary pane (in abbreviated form) and on the main pane (in expanded form, including a label). These are called "spots" and there are two basic types:
- Static Spots - Well-known spots of interest on the band which are relatively static. They usually represent places where certain kinds of activity can be found, such as specific digital modes, or specific stations, such as W1AW, well-known beacons, etc. These are defined in a configuration file which is distributed with BandAid. (See the Spot Configuration section below for details.)
- Dynamic Spots - Stations which have been detected on the band in real-time. These come from the excellent HamQTH.com website and are updated every minute. They provide a visual clue where activity is occurring at any given time.
- Current Frequency - Indicates the current FLDIGI frequency (and presumably your transceiver's frequency, too). Assuming BandAid is connected to FLDIGI, this will be displayed at the proper location on the proper band as a red bullseye. (See the Transceiver Control section below for more details.)
Configuring
At this time, there are only two items to configure in BandAid - your callsign and your license class. Your callsign is simply displayed in the window header. Your license class is used to identify the regions of each amateur band in which you have permission to operate. This is a handy way to "stay legal" as you wander around the bands. Select Operator on the Configure menu to open a dialog to enter these parameters.
NOTE: Any change to your callsign is reflected immediately in the window header. However, if you change license class, you will need to restart BandAid for it to take effect.
Band Browsing
To change bands, make a selection from the Band menu. The name of the current band is displayed in the window header. To move around the band, click anywhere in the summary pane. This centers the main pane at that point in the band. The "current view" overlay in the summary pane will move accordingly. You can click and drag the "current view" overlay anywhere in the current band and the main pane will move with you.
NOTE: Browsing around the bands does not change your radio's frequency. That can only be done by clicking on a band spot. More on this later.
Main Pane Interaction
- Left-clicking on a band spot label centers that spot in the main pane and, if connected to FLDIGI, a request to change to that spot's frequency is issued. (See the section below on "Transceiver Control".)
- Right-clicking on a band spot label pops-up additional information about the spot. If it's a static spot, the spot's frequency is displayed. If it's a dynamic spot, detailed information about the station and when it was detected is displayed.
- Only one detail popup is visible at a time - if you popup a new one, any existing popup is first closed.
- To dismiss a detail popup, simply click anywhere else in the main pane.
Transceiver Control
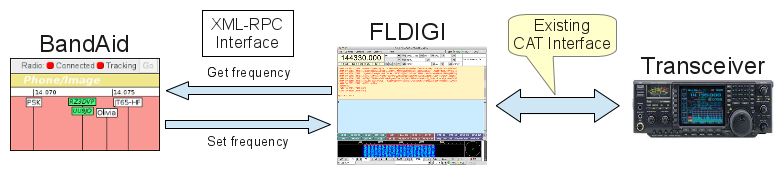
BandAid is designed to interact with your transceiver through the excellent digital modem program FLDIGI. BandAid communicates with FLDIGI using its standard XML-RPC interface, using the default configuration. Assuming you've not changed FLDIGI's xml-rpc configuration, the interface should work. BandAid will automatically detect when FLDIGI is running. When it is, the Connected indicator on the menu bar will be green and FLDIGI's current frequency will be indicated by a red bullseye, as previously described.
Transceiver Tracking
When connected to FLDIGI, BandAid will always display the current frequency at the appropriate place on the appropriate band. However, a completely different section of the band or an entirely different band may be currently displayed, so the frequency may not be visible. This is "non-tracking mode" and is denoted by a red Tracking indicator on the menu bar. You are free to move to any location of any band in "non-tracking mode" without affecting the current transceiver frequency.
If you left-click on the label of any spot or the current frequency "bullseye" on the main pane, Band Aid will tell FLDIGI to change to that frequency, which will, in turn, change your transceiver's frequency. BandAid will also center the main pane display on the selected spot and enter "tracking mode", denoted by a green Tracking indicator on the menu bar. While in "tracking mode", BandAid will keep the current transceiver frequency centered in the main pane. Any change of transceiver frequency - either at the transceiver, itself, or on FLDIGI - will be reflected on the BandAid display.
Left-clicking anywhere in BandAid's summary pane or switching bands will immediately move the main display to that location, as usual, and automatically switch to "non-tracking mode". When in "non-tracking mode" and when connected to FLDIGI, you can immediately jump to the current frequency by pressing the QSY button in the menu bar. Doing so will immediately cause BandAid to switch to the proper band and center the current FLDIGI frequency in the main pane. This will also re-enter "tracking mode".
Spot Configuration
Band Spots are defined in the BandPlanDefs.xml configuration file in BandAid's configuration directory. (On Linux, this is ~/.bandaid.) The file distributed with BandAid contains definitions for all bands from 160m through 6m and includes useful band spots in each. However, you are free to add or change the definitions to suit your own needs using a regular text editor.
A detailed description of the file format has yet to be written, but using existing entries as a guide, you can add new entries or modify existing ones. Perhaps the easiest and most common change you will want to make is adding new static spots at points of particular interest to you. There's no defined limit to the number of spots you can define. BandAid attempts to lay them out in a pleasing manner, but it's certainly possible to create so many close together that they crowd each other visually. Feel free to experiment.
NOTE: Since the configuration file is read only on start-up, you'll need to restart BandAid to see changes take effect.